The scar looked convincing on the backing sheet. Once it reached your cheek, however, the edge curled near your smile line. Once you blended makeup around the scar, its bright red edges became harder to distinguish from the rest of your skin.
That is the difference between choosing a design and actually wearing it.
Halloween temporary tattoos can create stitched cuts, branching veins, theatrical scratches, and other character details without requiring you to paint every line by hand. Their finished appearance depends on the placement, the condition of your skin, and the way you handle the transfer.
This guide walks through the process from the first test placement to the final cleanup. The techniques apply mainly to water-transfer decals; always follow the instructions supplied with your particular product.
Where to Place Halloween Temporary Tattoos for the Best Effect
A scar that sits neatly on your forearm might wrinkle near your elbow or curve awkwardly across your cheek. Hold the unpeeled tattoo against your skin first to see how its shape follows the area. Use a mirror or ask someone to check its position from a short distance.
A scar across the cheek can change shape when you smile. Vein patterns along the forearm may stretch visually as you turn your wrist. A large wound decal on the neck may crease whenever you look down.
Match the Design to the Body’s Shape
Flatter areas, such as the upper arm or outer forearm, often make positioning easier. Areas with frequent bending, friction, or pronounced contours require more care.
For a facial effect, notice where your natural expression lines fall. A long cut placed directly across a deep crease may not sit as smoothly as a smaller mark positioned nearby.
Avoid eyelids, lips, the immediate eye area, mucous membranes, irritated skin, and broken skin unless the product specifically states that the location is suitable.
Consider Clothing and Accessories
A vampire collar can rub against a neck design. Long sleeves may repeatedly brush a tattoo near the wrist, while a wig can conceal a carefully placed temple detail.
Put on the main costume pieces before settling on the placement.
For Halloween temporary tattoos intended to remain visible in photographs, check the result with your costume fully assembled rather than judging the design against bare skin alone.
Prepare the Skin Before Opening the Backing
A few minutes of preparation can prevent a frustrating transfer.
Leftover lotion or foundation can make the tattoo slide out of position or leave parts of the printed design behind on the backing paper.
Wash the intended area gently, rinse away cleanser, and allow it to dry completely.
If you have recently applied skincare products, consult the tattoo instructions to determine whether the surface needs further cleaning.
Make Room for a Patch Test
Test a small piece according to the manufacturer’s guidance before using a larger design, particularly if you have sensitive skin or a history of reactions to adhesives or cosmetics.
Stop if itching, burning, redness, or discomfort develops. Do not apply the design over a rash, sunburn, cuts, or other damaged skin.
Check the ingredient and age guidance on the packaging. A product described as waterproof or skin-friendly is not a guarantee that every person will tolerate it.
Keep Your Tools Simple
For most conventional water-transfer Halloween temporary tattoos, the useful items are a clean pair of scissors, a damp sponge or cloth, a mirror, and a dry towel.
A second mirror can help with placements near the shoulder or side of the face.
Lay everything out before removing the transparent film. Once the transfer surface is exposed, handling it repeatedly may make positioning harder.
How to Apply Halloween Temporary Tattoos Step by Step
Pressing harder won’t fix a transfer that hasn’t absorbed enough water or has shifted against your skin.
Some designs require water on the paper backing; others use a different application system. Read the package directions before starting.
For a typical water-transfer decal, the process follows this sequence.
Step 1: Trim and Position
Cut around the printed design, leaving enough border to handle it comfortably.
Remove the clear protective sheet only when you are ready to apply the tattoo.
Lower the tattoo onto your chosen spot with the artwork facing your skin, taking care not to let the paper slip. Check its direction before adding water, especially for designs with lettering or asymmetrical details.
Step 2: Wet the Backing Evenly
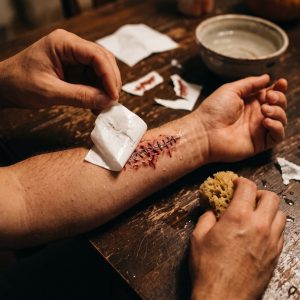
Hold a damp sponge or cloth against the paper backing for the period stated in the product instructions.
Pay attention to the corners. A dry patch may prevent part of the image from transferring.
Avoid sliding the paper across the skin while it is wet.
Step 3: Lift the Paper Carefully
Once the required time has passed, gently test whether the backing releases.
If the design has not transferred, follow the product instructions rather than pulling harder.
Remove the paper without dragging it over the image.
Step 4: Let the Surface Settle
Allow the transferred design to dry. Avoid rubbing it with a towel or immediately covering it with makeup.
Check for tiny corners lifting away from your skin, especially where the design crosses a natural crease. If a corner has folded, do not aggressively scrape or pull at it.
The first few minutes are particularly useful for checking whether the placement interferes with facial expressions or clothing.
Applying Halloween temporary tattoos slowly is often more effective than trying to finish several designs at once.
Styling Halloween Temporary Tattoos With Makeup
A realistic scar does not always need additional fake blood. Sometimes the printed shading already provides enough depth.
Look at the transferred design in ordinary light before reaching for a makeup brush.
If the surrounding skin needs color, work outward from the tattoo rather than repeatedly brushing over its edges.
Scar Designs for Vampire and Gothic Characters
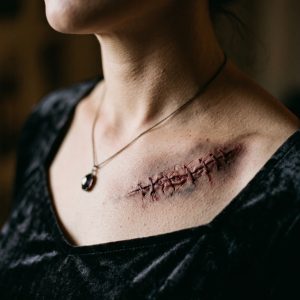
A thin stitched mark near the cheek or collarbone can suggest a character’s history without requiring a full-face transformation.
Keep the surrounding makeup relatively controlled if the scar is meant to attract attention.
For a vampire-inspired look, a pale complexion, defined eyes, and a single scar may communicate more than several unrelated effects competing across the face.
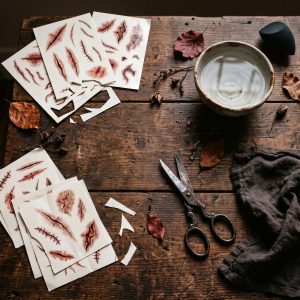
The Stylish Halloween Blood Scar Tattoos collection includes cut, scratch, and wound-inspired designs that can be considered for theatrical character styling.
Vein Patterns for Supernatural Looks
Branching lines work differently from wounds.
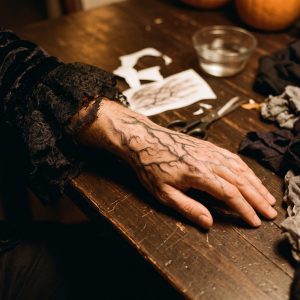
They can suggest a supernatural transformation, particularly when the design appears to emerge from a sleeve or travel along the side of an arm.
The Halloween Temporary Tattoos Collection includes vein-style designs alongside scar and wound effects.
For Halloween temporary tattoos featuring fine veins, avoid burying the printed lines beneath opaque foundation. If you use surrounding makeup, blend it around the pattern so its details remain visible.
Fake Wounds and SFX Makeup
A wound decal can serve as the central detail of a zombie or horror-inspired character.
Additional cosmetic shading may help connect it visually to the rest of the look, but compatibility matters.
Oil-based creams, powders, and setting products can interact differently with tattoo films. Test the combination on a small area and follow both products’ instructions.
Use only skin-approved cosmetic products in their intended application areas. Do not put craft paint, household glue, or non-cosmetic adhesives on your skin.
Halloween Temporary Tattoos for Different Costume Styles
The same tattoo sheet can support several characters, depending on which design you choose and how much of it remains visible.
A scar does not automatically make an outfit frightening. Its effect changes when paired with a tailored vampire costume, a witch dress, or a torn zombie-inspired shirt.
A Restrained Vampire Detail
Try one narrow scar near the jawline or a small mark above the collar.
Keep the costume’s neckline in mind. A design hidden beneath a high collar contributes little to the finished appearance.
A Witch With Vein-Like Accents
Fine branching patterns can complement dark eye makeup or a dramatic sleeve.
Rather than filling both arms, place one design where it can be seen when you gesture or hold a drink.
A More Theatrical Zombie Look
A larger wound effect may suit an exposed forearm or upper chest, provided the product is approved for that area.
Use the costume fabric to frame the design. A torn sleeve can reveal a printed wound without requiring additional effects on every visible part of the body.
For broader character inspiration, explore Halloween Party Costume Ideas for Adults. That article focuses on costume concepts; here, the attention stays on placing and finishing the skin details.
When selecting Halloween temporary tattoos, consider how much of the design guests will actually see during the event.
What Makes a Tattoo Look Too Obvious?
A visible rectangular edge can interrupt an otherwise convincing effect.
So can a pattern that seems unrelated to the character or one that crosses a moving joint awkwardly.
These problems are not always solved by adding more makeup.
Check the Design Under Different Lighting
Bathroom lighting can reveal small application details, but the party may have colored lamps or dimmer ambient light.
Take a photograph in the lighting you expect to encounter.
A dark vein pattern may become difficult to distinguish under purple light, while a bright red wound can appear more prominent beneath neutral lighting.
Leave Some Natural Skin Visible
A cluster of small scars may look more intentional than covering every available area with separate decals.
The space between the effects helps each design remain recognizable.
For Halloween temporary tattoos used in close-up photographs, inspect the edges and placement rather than relying only on the overall impression from across the room.
How to Keep the Design Looking Neat During the Party
Once applied, a temporary tattoo still experiences friction from clothing, accessories, and ordinary movement.
A sleeve rubbing repeatedly against a wrist design may affect its appearance. Touching or picking at the edge can also disturb the film.
Avoid unnecessary rubbing, and follow the product’s instructions concerning water, perspiration, skincare, and cosmetic products.
Watch for Makeup Transfer
If you have added makeup around a scar, be careful when changing clothes or adjusting your costume.
A high collar may brush across the area each time you turn your head.
Even a tattoo labeled waterproof may start peeling where a sleeve rubs against it or sweat collects beneath the design. If a corner comes loose during the party, leave it alone rather than trying to stick it back with household glue.
Respond to Skin Discomfort
A costume detail is not worth persistent irritation.
If the application area becomes uncomfortable, remove the tattoo using the recommended method. If you develop a significant or persistent reaction, seek medical advice.
Do not apply a replacement over the same irritated area.
How to Remove Halloween Temporary Tattoos Gently
The end of the evening is not the moment to scrub your skin aggressively.
Removal depends on the tattoo’s adhesive and film. Some products release with an oil-based remover, while others have specific instructions.
Begin with the manufacturer’s recommended method.
Soften Before Wiping
If the instructions permit an oil-based remover, apply a small amount of suitable product and allow it time to loosen the transfer.
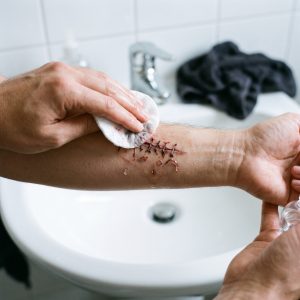
Once the tattoo begins to loosen, use a cotton pad to lift away the remaining print without dragging it across your skin.
Do not use abrasive tools, harsh solvents, or repeated forceful rubbing.
For Halloween temporary tattoos near the face, take particular care to keep removers away from the eyes and mouth.
Clean the Skin Afterwards
Wash away any remaining remover with a mild cleanser and lukewarm water, then pat the area dry.
If the skin feels dry, a suitable moisturizer may help, provided there is no irritation and the product is appropriate for your skin.
If a faint outline remains after washing, give the skin a break instead of rubbing harder to remove the last traces.
If removal causes burning, marked redness, or swelling, stop and seek appropriate medical advice.
Choosing Between Scar, Vein and Fake Wound Designs
The most useful comparison is not which sheet looks the most dramatic in its packaging. It is which effect fits your costume and the amount of skin you want to decorate.
| Design type | Visual effect | Placement consideration |
| Scar tattoos | Stitches, cuts, scratches | Check facial movement and clothing friction |
| Vein tattoos | Branching lines, supernatural detail | Preserve fine lines and avoid deep creases |
| Fake wound tattoos | Larger theatrical injury effects | Allow enough flat space for the full design |
The EZPartyStore Temporary Tattoos Collection brings together scar, vein, and fake wound options for comparison.
Before purchasing Halloween temporary tattoos, review the number of sheets, individual design sizes, approved application areas, transfer instructions, and removal guidance.
A larger pack may provide more choices, but the designs still need to suit the character you intend to create.
Frequently Asked Questions About Halloween Temporary Tattoos
Can I apply temporary tattoos over foundation?
Many water-transfer designs are intended for clean, dry skin rather than a layer of foundation. Apply them according to the package instructions, then test any compatible makeup around the finished design.
How long do Halloween temporary tattoos last?
Wear time varies with the product, placement, friction, and exposure to water or skincare products. Refer to the manufacturer’s stated duration rather than assuming every decal will last the same number of days.
Can I put a fake scar tattoo near my eye?
Avoid the immediate eye area unless the product explicitly approves that placement. A design intended for the arm or cheek should not automatically be treated as suitable for eyelids or areas close to the eye.
Why did my temporary tattoo transfer unevenly?
Possible reasons include an oily application surface, insufficient moisture on part of the backing, movement during transfer, or a location with pronounced creases. Check the product instructions before attempting another application.
Can I remove temporary tattoos with oil?
Some products can be removed using an oil-based method but follow the specific manufacturer’s guidance. Use gentle pressure and avoid harsh solvents or abrasive scrubbing.
Finish the Character Without Overworking the Detail
A scar that follows the cheek naturally, a vein pattern emerging from a sleeve, or a small wound visible beneath a costume collar can change how a character reads.
The effect does not need to cover a large area to be noticeable.
Choose the placement before applying makeup, work carefully through the transfer process, and leave enough time for the design to settle before getting dressed.
With Halloween temporary tattoos, the most convincing result often comes from one carefully positioned detail rather than an entire sheet used at once.
After the party, remove the design patiently and give your skin the same attention you gave the costume.